How to Create a Truly Portable Ubuntu Installation on an External USB HDD or SSD
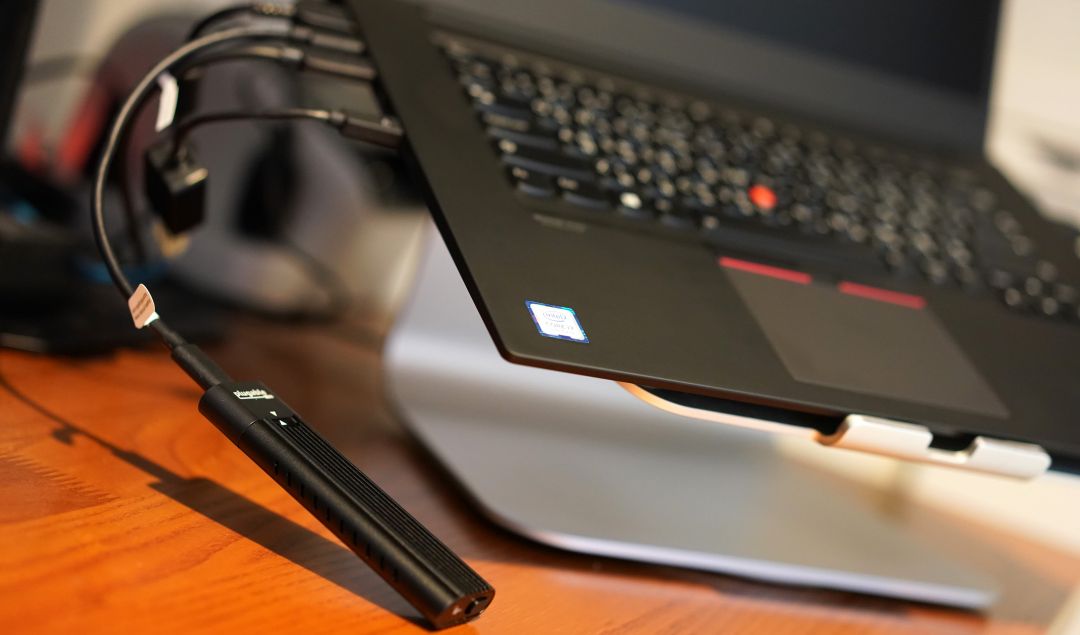
Update: 17-08-2020 - a few people have asked which NVMe external enclosure I'm using in the photo above. I was using a the 'Plugable Tool-Free NVMe' enclosure, but started to have difficulties with the Realtek RTL9210 controller and/or their USB cables. I was having difficulty removing all partitions from the drive under Ubuntu using GParted - with GParted freezing on device re-scan. I've since switched to the TDBT M.2 NVMe SSD Enclosure (using the JMicron JMS583 controller), which is working great. The enclosure, installation instructions, parts, are all top quality and the heat sink works. The only caveat so far is that a Belkin USB-C cable I have here refused to recognize the TDBT device. The cables that came with the TDBT enclosure work fine. (Note that I'm not in anyway affiliated with TDBT, nor do I have an affiliate link with Amazon.)
Update: 07-02-2021 - C.S.Cameron posted this to askubuntu.com - https://askubuntu.com/questions/1217832/how-to-create-a-full-install-of-ubuntu-20-04-to-usb-device-step-by-step Although I've not tested this yet - it's a great post and appears to support both UEFI and older BIOS/MBR configurations.
Original Post: So this turned out to be fun, and productive - on several levels.
I recently upgraded the SSD in my main desktop computer and found myself with a spare 512GB M.2 NVMe SSD. At first I thought I’d simply use the spare drive for backups or ad hoc storage, but then I recalled that ages ago I’d explored the idea of being able to simply plug the operating system of my choice into the USB port of a computer or laptop, and boot whatever flavor of OS I cared to. At the time, USB 2.0, Firewire or even e-SATA meant that this wasn’t really practical. With USB 3.0 to 3.1 Gen 2 supporting transfer speeds that now range from 5Gbits/s to 10Gbits/s - things are a bit different. Regular SATA-based external SSDs will deliver transfer rates of around 500MB/s, while new M.2 NVMe to SATA bridge enclosures will top out at around 1GB/s (that’s one gigabyte per second, not gigabits). So clearly in terms of storage and bandwidth, there’s nothing here that would interfere with comfortable boot times and data transfer rates for any modern OS.
There’s only fly in the ointment, and that is that during most ‘normal’ operating system (OS) installations - the OS being installed expects to either create, or find just one master boot record (MBR) or just one Unified Extensible Firmware Interface (UEFI) system partition (ESP). If a UEFI ESP partition already exists, the installing OS will typically give you a choice to overwrite, or modify boot loaders in the ESP with the option of creating a ‘dual boot’ installation. The problem with this process is that the new operating system - whether on an external drive or other, is now ‘bound’ to the computer’s main system partition and boot information. Not only is the external drive dependent on the boot information present in the host computer system partitions, but in most cases the computer won't boot if the external drive is removed. Not what we want.
I did a bunch of reading and found the main Grub docs that describe how to repair/reinstall grub, but more importantly, I found Nicholas Dionysopoulos's post here https://www.dionysopoulos.me/portable-ubuntu-on-usb-hdd/ - which was brilliant and paved the way. Most of what follows is roughly aligned with Nicholas’s post.
Like Nicholas, the machine I’m using to do all of this is a Windows 10 computer, and so if this is the same for you, then section F below will almost certainly apply and your computer will be left with a ‘dual boot’ configuration and Grub menu prompt at boot. If you’re concerned about this, read ahead and review the fixes before proceeding. And as with any OS / disk / partition-level activity, make sure you have backups of everything before you start.
Here are the steps I went through in order to create a truly portable external SSD drive with Ubuntu 19.10 installed. Note that we’re going to create a UEFI bootable portable drive, and so any computer you plug this drive into must be relatively modern with support for UEFI as well as have pretty good hardware support from Ubuntu / Linux.
A. What You’ll Need
To start you’ll need two things:
- A bootable USB thumb drive with the Ubuntu 19.10 installation media. You can create this from a Windows computer using Rufus or from an existing Ubuntu installation with ‘Startup Disk Creator’ - see How to Create a Bootable Linux USB Flash Drive, the Easy Way . Check that you can boot from this thumb drive on the computer you plan on working from. Choose the ‘Try Ubuntu’ option.
- Your target portable external hard drive (HDD, SATA SSD, M.2 NVMe SSD etc.). Note that we’ll re-partition this drive, so backup any data that may already be on the drive as it will be lost during re-partitioning.
B. Getting Started
- Boot your computer using the thumb drive prepared above, and choose ‘Try Ubuntu’.
- Plug in your target portable external hard drive.
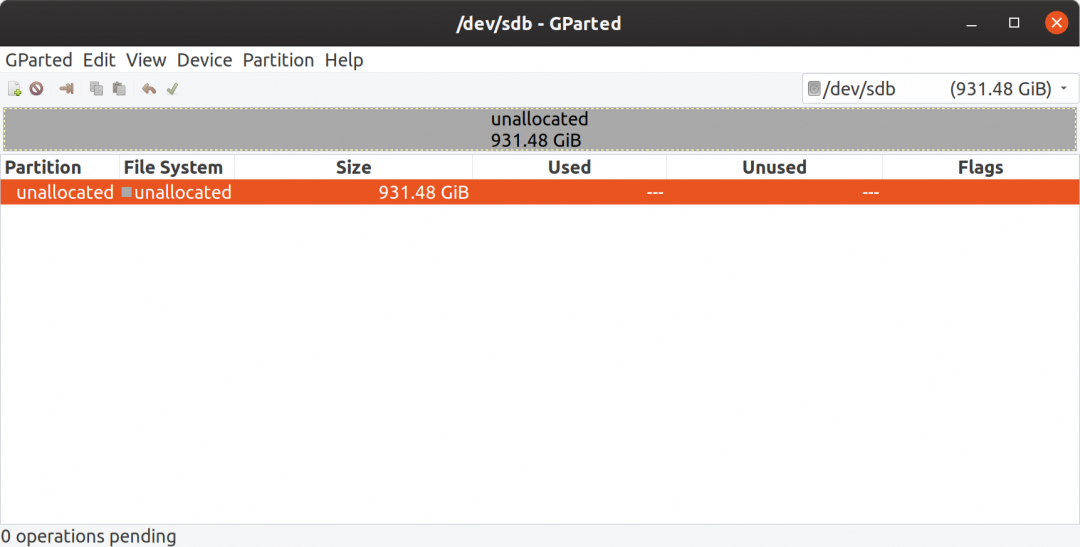
- Start GParted. GParted is the partition manager application we’re going to use to prepare the portable hard drive. Once GParted is started - in the upper right corner, change the target drive to your external portable drive. It’s important that you correctly identify this drive as we’re going to re-partition the drive. In the screenshot below - my external and portable drive is identified as /dev/sdb - and it is currently unpartitioned. Unmount (right click and unmount) any currently mounted partitions on this drive and delete all partitions (again - be double sure you’re working on the correct drive).
C. Preparing the Portable Drive
We’re going to create three new partitions on the target external drive.
- Again using GParted, right click on the unallocated volume, choose New, and create a 100MB fat32 partition. Click on the green checkmark to apply the pending operation. Once the partition has been created - right click on the newly created partition and select ‘Manage Flags’. Enable the boot and esp flags. When we're done, this partition will become the system ‘boot’ partition, and will include EFI information including the GNU GRUB boot loader. In fact, creating this partition as a working boot volume under EFI using GRUB is the heart of our problem in trying to create a truly portable external OS drive, and so there are a few more steps to complete before we can achieve this.
- Next create an 8GB linux-swap partition. The size of your swap partition may vary and so you’ll need to do a little research to determine the appropriate size for your expected workload. A rule of thumb for modern personal computers with plenty of RAM is to create a swap partition about ½ the size of available RAM if you DO NOT plan on supporting full hibernate (most computers will still suspend or sleep fine).
- Finally, create the main or root / partition for our target portable drive. Create an ext4 partition of whatever size you require for your system. Apply all pending operations and you should now have a disk partition layout that looks similar to the screenshot below. [Note that in my case I still have about 500GB unallocated space as this is a 1TB external drive. Also note that in my ‘real’ setup I created a 64GB ext4 volume for Ubuntu OS, and then when everything was up and running, I created an additional 256GB ext4 volume which I then encrypted with LUKS, and mounted as my /home directory]
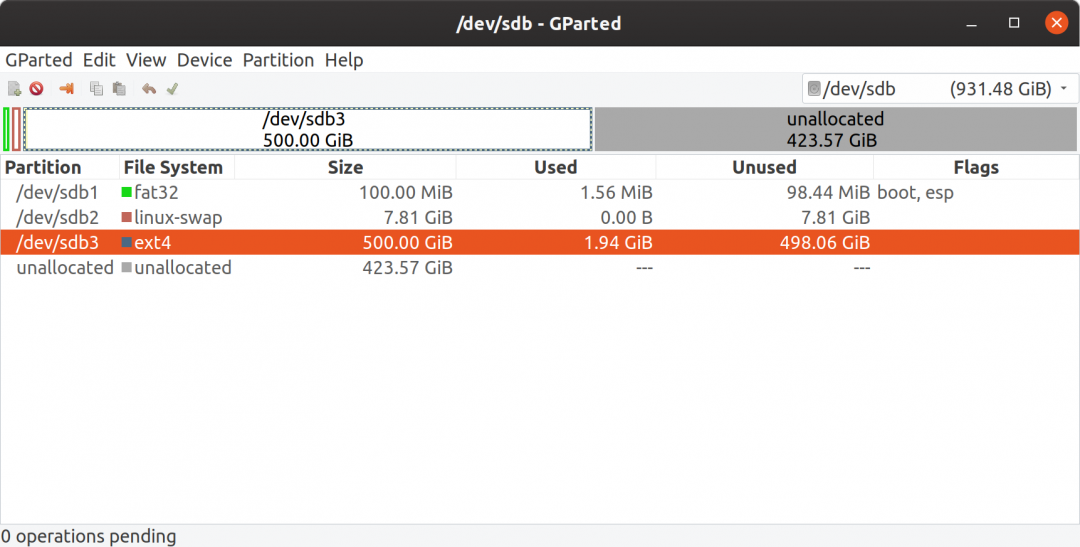
With the external drive all prepared, we now need to make a couple of notes, specifically - note the device and partition numbers. In this example my external drive is identified as /dev/sdb with partitions located on /dev/sdb1 (fat32 system/boot), /dev/sdb2 (linux-swap), /dev/sdb3 (ext4 root volume). We also need to record the UUIDs of the system and root volumes for this drive. Double click on the fat32 system partition at /dev/sdb1, and from the ‘Information about’ screen that pops up - make a note of the UUID. In my case: ED3C-7CB8. Now do the same for the root volume - the ext4 partition on /dev/sdb3 - double click on the partition and note the UUID. In my case: dd8eed75-c315-420f-b208-92301cfbf300.
We’re now almost ready to install Ubuntu 19.10 on this drive. Note first however, that in two attempts at this process, the system volume of the computer I was using for this process (my Windows 10 computer) was modified and left with a dual boot installation, which is NOT what we want (as that would effectively ‘bind’ our external hard drive to this computer). When we install Ubuntu 19.10 - we’ll mainly follow the instructions here - How to install Ubuntu on portable external Hard Drive? - however, during installation - Ubuntu 19.10 will use the first UEFI system partition it finds to install the modified bootloader, and so the instructions in the previous link that specify the following: “Very important: change the installation of the bootloader to the USB HD. This will most likely be /dev/sdb. This will prevent you from overwriting the master boot record on your hard drive. (If you do this by accident, it's easily fixed).” - simply won’t work. The only scenario I’ve not yet tried to prevent this is unplugging, or removing the computer’s internal hard drive before installing Ubuntu onto our target external drive. The remaining steps will show how to fix this, as well as how to correctly install a working GRUB bootloader onto our newly created /dev/sdb1 system fat32 ESP partition.
D. Install Ubuntu 19.10
With your external target drive all prepared we’re now ready to install Ubuntu 19.10. As per the link in the previous section, we’re going to start a normal installation followed by ‘Something else’ when we get to the partition selection step. You should still be booted from your Ubuntu Installation media thumb drive.
Close GParted and then double click on the Install Ubuntu 19.10 icon on your desktop. Choose your language settings, and optionally install third-party drivers. On the next screen, for ‘Installation Type’ - choose the last option ‘Something else’ before proceeding.
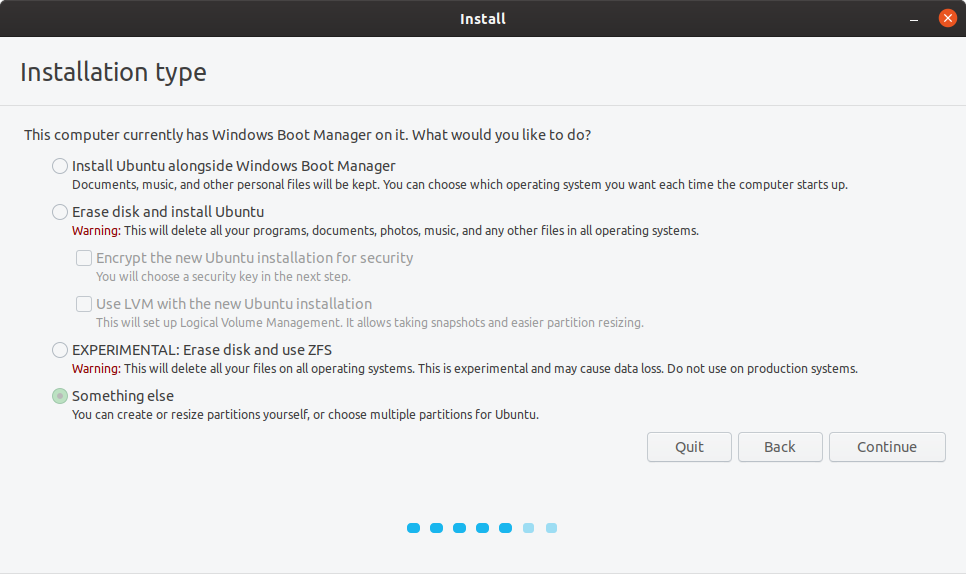
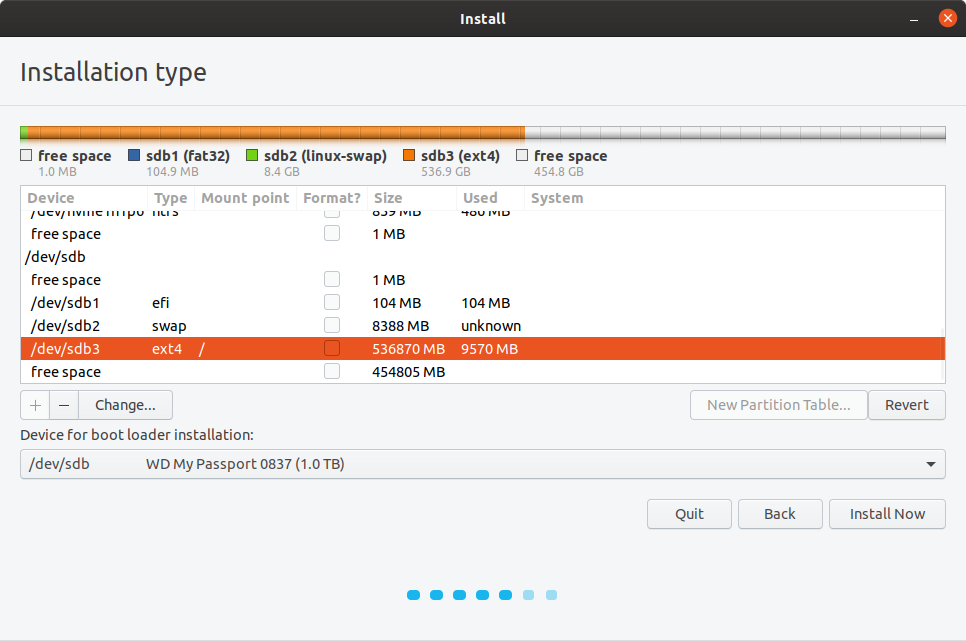
Now that we’re on the ‘Something else’ installation type screen - scroll down the list of available drive volumes until you see your device and the partitions we previously created. In this example /dev/sdb1, /dev/sdb2, and /dev/sdb3.
- Double click on the 100MB fat32 system efi partition we created (/dev/sdb1)and choose ‘Use as EFI system partition’ but do not format the partition.
- Double click on the /dev/sdb2 partition and choose ‘Use as swap area’.
- Then double click on the /dev/sdb3 partition - and choose use as 'Ext4 journaling file system’, and set the mount point to / or root, and again do not format this partition.
- Lastly - select the ‘Device for boot loader installations:’ to the name of the device for your external hard drive (although as noted above, this may not work and you’ll need to follow the remaining steps below).
Your settings should look like the following:
Go ahead now and install Ubuntu 19.10 to your external drive - setting your timezone, and user account information as you would with a normal Ubuntu installation.
E. Install Grub onto the ESP partition
As previously mentioned, the Ubuntu 19.10 installation process will likely have created a ‘dual boot’ installation by modifying your host computer's main EFI / ESP partition, effectively ‘binding’ your external drive to this computer. If so, there are two remaining tasks.
First, we need to correctly install the Grub bootloader onto the boot partition of our external portable drive - turning it into a truly portable installation.
The second and last step will be to remove the ‘dual boot’ configuration from the computer you are using to create this new external and portable drive. You can check to see if any of this applies to you by rebooting your computer WITH the new external drive plugged in - but selecting your computers primary disk (not the external disk) to boot from. If you see a ‘dual boot’ Grub option screen - then everything that follows applies.
Make sure you’re now booted from the Ubuntu installation thumb drive (in the ‘Try Ubuntu mode), and start the ‘Terminal’ application.
First we’re going to unmount the media volume of the thumb drive (leaving ‘Try Now’ Ubuntu running in memory only). Replace the 'uuid of your media' text below with the uuid in your system. There should be only one under media/ubuntu.
sudo umount /media/ubuntu/<the uuid of your media>
Now we’ll mount our new Ubuntu installation root volume from our external drive..
sudo mount /dev/sdb3 /mnt
We now need to fixup the UUIDs of the mount points in fstab for our external Ubuntu installation using the UUIDs we made a note of earlier:
sudo nano /mnt/etc/fstab
Copy and then comment the line with the /boot/efi mount point. In your new line replace the current UUID with the one from above - in this case ED3C-7CB8
The swap and root /mount points should be pointed to the correct volumes on our external drive. Save and close the file
Now we need to mount our new EFI / ESP system partition - our 100MB fat32 partition on /dev/sdb1
sudo mount /dev/sdb1 /mnt/boot/efi
We now need to create some special system process mount points in our ‘simulated’ Ubuntu system, so that we can chroot into this volume and install Grub from the Ubuntu installation of our external drive itself (it must be installed using the same OS as the loader will target at boot).
sudo mount -B /dev /mnt/dev
sudo mount -B /dev/pts /mnt/dev/pts
sudo mount -B /proc /mnt/proc
sudo mount -B /sys /mnt/sys
Next we’ll copy over our current DNS settings just in case we need network access...
sudo cp /etc/resolv.conf /mnt/etc/
Next we load efivars. The modprobe efivars command loads the efivars kernel module, which gives the kernel access to EFI variables stored in NVRAM
modprobe efivars
Finally we’ll switch into a chroot environment in our simulated OS on the external hard drive…
sudo chroot /mnt
And now after all that, we're ready to install Grub. As with all of the instructions above, be sure to change /dev/sdb with your own external drive device identifier.
grub-install -d /usr/lib/grub/x86_64-efi --efi-directory=/boot/efi/ --removable /dev/sdb
As Nicholas Dionysopoulos says in his excellent post "When you have an external drive it is critical that you use the –removable option in the last step. This installs the EFI bootloader under the special “fallback path” EFI\Boot\bootx64.efi in the ESP. Normally this not supposed to be used for permanently installed Operating Systems. It’s the mechanism used by EFI BIOS to boot arbitrary external media. Technically, that’s exactly what our external hard drive is: arbitrary external media"
Your new external drive should now be bootable in any machine.
F - Clean up the Dual Boot configuration
We now need to clean up the EFI / ESP partition on the computer you used to create the portable external drive. In order to boot this machine you’ll need to leave your new bootable external drive plugged in, or Grub will report an error and you won’t have any boot options. Reboot and choose your Windows installation to boot.
I now have a confession to make. I must have tried four or five different methods for removing the Grub dual boot configuration from my Windows 10 machine, including creating a full recovery media thumb drive and booting from it in recovery mode and attempting several commands I'd seen documented elsewhere. If anyone knows of the correct way to do this, please leave a comment below!
What worked in the end was the following:
Boot Windows and start a cmd window with administrator privileges:
Start the ‘DiskPart’ disk partition utility and list disks
list disk
Choose the hard disk that is your primary boot hard drive for this computer. Likely disk 0
select disk 0
Show the partitions on this disk
list partition
Select the EFI / ESP system partition (likely also 100MB)
select partition 1
Assign a free drive letter to this partition
assign letter=Z:
Exit DiskPart and change to the Z: drive Change into the EFI directory and remove the ubuntu sub-directory using:
rmdir /S ubuntu
Reboot your computer again, and your Windows installation should 'just start' as before - without any prompts from Grub or any sign of 'dual boot'.
After that - happy booting anywhere you like with your new external and portable hard drive.
Comments
Glad the Ubuntu install went…
Glad the Ubuntu install went okay, but sorry to hear about the Windows issue Andrzej. I'm not familiar with this particular McAfee product. I hope you're able to solve it.
Hi, Thanks for the very good…
Hi,
Thanks for the very good instruction!
The command to mount the EFI partition (above example "sudo mount /dev/sdb1 /mnt/boot/efi") reported no such directory.
After realising I have a separate boot partition I preceded that mount EFI command with a "mount " (viz. "sudo mount /dev/sdXY /mnt/boot")). This then allowed the EFI partition to be mounted at /mnt/boot/efi
Also, after doing the "sudo grub-install" I followed with "sudo update-grub".
Cheers
Peter
Having a problem here... I…
Having a problem here...
I finished the instructions just fine, with the exception beeing, that all the uuids were already correctly set, as I hat unplugged all my drives from my computer. Now however, the SSD is not showing up in my laptops boot device selection.
I have no idea on how to get started to diagnose the problem.
I can boot the USB installation media no problem and boot to the SSD on my main machine. Just my laptop won't show the device at all.
Any idea what to do about that?
Maybe a missing driver for the usb to nvme enclosure?
sudo mount /dev/sda2 /mnt…
sudo mount /dev/sda2 /mnt

sudo rm -r /mnt/EFI/ubuntu

sudo efibootmgr
This can be used to remove Ubuntu from dual boot as well. source : https://askubuntu.com/questions/219869/i-removed-ubuntu-from-the-bios-m…
I tried something similar to…
I tried something similar to this in a VirtualBox with Debian 10.7.
Installing GRUB with --removable to make a removable drive and --no-nvram to avoid adding it to the UEFI/NVRAM variables works.
It is not shown in efibootmgr -v.
However when rebooting and selecting the portable drive in the UEFI boot manager, then something adds the portable drive installation to the UEFI boot order anyway.
This flashes by before loading GRUB:
System BootOrder not found. Initializing defaults.
Creating boot entry "BootXXXX" with label "debian" for file "\EFI\Debian\debian64.efi"
This unwanted boot option is left in the UEFI boot order when the drive is removed from the machine.
This does not happen when running the Debian live CD in the same VirtualBox.
How to stop it from adding the portable drive installation to the UEFI boot options permanently each time it is booted?
So I think I found a…
So I think I found a possible way to get rid of the Dual Boot configuration after experiencing the exact same problem. I did not scroll through all the comments so forgive me if someone already mentioned it.
In my case, I had a PC with Ubuntu and Windows running next to each other. I wanted to only clone the Ubuntu OS to my external SSD. I followed all of your steps A-E and furthermore, I used "fsync" to kind of clone my entire ext4 partition of the original Ubuntu OS on my PC to the SSD (see here for reference: ). Then I did the following to be able to make the SSD truly portable and independet of the original PC with Windows installed:
1. I booted the original Ubuntu on my PC and mounted the SSD in /mnt. On the external SSD, under /etc/grub.d, I deleted the file "30_os-prober" that was automatically generated when I created the EFI-partition on the SSD and installed GRUB according to your instructions. I do not entirely understand what is written in there but it didn't matter in the end
2. I just the content previously deleted with what is written in the exact same file of my original Ubuntu-OS (remember this is where I am booted in, the SSD is only mounted). After that, I was able to use the SSD independently and everything is fine!
So, if you are able to find in this "etc/grub.d/30_os-prober"-file where exactly the Windows-Stuff is written, you can solve this even more elegantly than I did! Please let me know if you want me to elaborate on this.
Kind regards,
Lukas
Installed Ubuntu to portable…
Installed Ubuntu to portable USB HDD with much easier method.
Unplug all HDD's from PC and plug in designated HDD with SATA cable and install from USB to HDD as usual. Plug HDD back into USB caddy and boot from USB connection on any PC, Laptop etc...
A few people have described…
A few people have described this approach. I guess the only think I wondered was whether this really works okay without Grub installed as -- portable i.e.
grub-install -d /usr/lib/grub/x86_64-efi --efi-directory=/boot/efi/ --removable /dev/sdbIt is not so hard to modify…
It is not so hard to modify the above instructions so that the USB device can boot in both BIOS and UEFI modes. You are welcome to use information found on this Ask Ubuntu page: https://askubuntu.com/questions/1217832/how-to-create-a-full-install-of…
Nice post on askubuntu.com!…
Nice post on askubuntu.com! Well done and thanks for sharing!
I cannot find the rmdir /S…
I cannot find the rmdir /S ubuntu in any of the partitions?
I got lost at the terminal…
I got lost at the terminal commands, it says to "Replace the 'uuid of your media' text below with the uuid in your system. There should be only one under media/ubuntu."
But I dunno what that means and it doesn't explain where to find the uuid or where media/ubuntu is I assumed they meant the uuid of my flash drive so I went into disks and put that into the command but it says "umount: /media/ubuntu/2020-04-23-07-51-42-00: no mount point specified" I tried to continue anyway but I don't think the commands were doing what they were supposed to because the instructions started saying to look for things that didn't exist or copy text that wasn't there.
I got further alone now but…
I got further alone now but got totally stuck at the fstab file, It says to save it but does not explain how to do so. I can x out of the terminal but it says it will close the process? I have no idea how to "save" this there is no save??????
Hi 'Hoot', glad you made…
Hi 'Hoot', glad you made some progress, but also very sorry that I'm not able to reply to all of the posts here, or offer individual support. Completely overwhelmed with work and other commitments at the moment. Keep trying and keep reading. All the best, Tony
Hi, thank you very much for…
Hi, thank you very much for this excellent guide. I hope someone will still supply to this. I followed every step, and everything worked fine. The I try to boot the disk it says: [FAILED] Failed to start *Remount Root and Kernel File Systems.*
I tried looking up a solution, and checked all of my stepps. I will try to do the full installation again, but I don’t see what went wrong.
If anyone could help I would be very thankfull.
nols
This is a very great…
This is a very great tutorial. Thanks so much! However, seems like every time there's an update for the GRUB it gets installed in my Windows installation instead the Linux hard drive. What could I do to avoid that? Thanks in advance.
I believe the first in using…
I believe the first in using gparted is to create a GPT partition table. I don't think MBR style will work with UEFI.
The article seems to give…
The article seems to give instructions for making a UEFI only USB and not a BIOS/UEFI device. See https://askubuntu.com/a/1217839/43926. When making a device that boots both Legacy and UEFI, I would recommend including the 1MB bios_grub partition at the beginning of the USB and creating the device while booted in Legacy mode, (if your computer will do so), and then re-install GRUB according to my link. An easier method for making a BIOS/UEFI bootable USB from an image file can be found here: https://askubuntu.com./a/1300458/43926
Very good Tutorial, but you…
Very good Tutorial, but you should make at least one additional Comment: I have a XPS15 and was wondering why I didn't get the boot Partion visible within boot manger. There are a lot of sites that having solutions for that (like BIOS Settings), but nothing worked. In the end I've found out, that I need to format the EFI Partition with FAT16 in Windows.
the UEFI OS device is not…
the UEFI OS device is not showing up when i plug in my external hard drive to another usb port. I want to use the usb3 port of my laptop but it only works with my 2.0 port. I have installed ubuntu when ext. drive was connected to 2.0 port. Can it be the problem?
Hi I installed ubuntu 21.04…
Hi I installed ubuntu 21.04 with this article and tried it with unplugged Windows drive so I did not have to perform dual boot fixes it worked great.
However I do have a problem that sometimes DNS does not resolve the server and I'm not sure it's caused by this installation or ubuntu 21.04 :(. I'd appreciate some input on this as I haven't touched DNS in ages and do not know what pieces it has in ubuntu.
Hello, I tried this on a…
Hello, I tried this on a Macbook Pro, and everything went without a error, but when I boot into the EFI device from my MBP I am presented by a black screen, I am not using a Nvidia card MBP and there is no read write shown by my external drive.
Can't you just remove the …
Can't you just remove the 'esp' flag from your already present EFI partition, install Ubuntu on your external storage as normal, and then put back the esp flag on your EFI partition after the install? That would be a hell of a lot easier than this.
To work around the installer…
To work around the installer bug, you do not need to physically disconnect the internal drive. It's enough to temporarily remove the EFI flag with gparted, much easier. See https://askubuntu.com/a/1056079/152287